Orange Triangle Ruler: A Craft Fair Maker’s Review
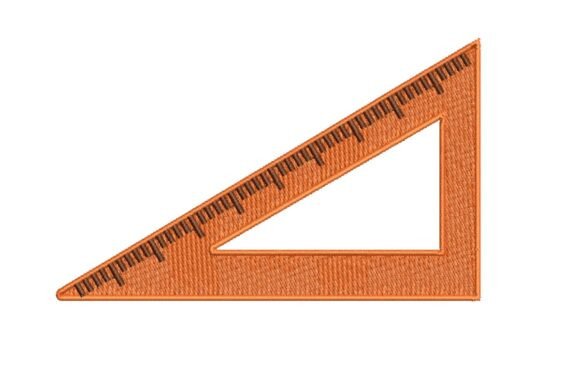
When I first pulled up the Orange Triangle Ruler embroidery file, I felt a jolt of nostalgia mixed with a clean, modern vibe. It is not just another apple or pencil. It is a set square, the kind you used in geometry class, but in a bright, confident orange. The design has measurement markings along two edges, which instantly gives it that technical, drafting-room feel. For a Back To School season booth, this is the kind of machine embroidery design that stands out because it taps into a very specific memory for students, teachers, engineers, and anyone who loves a crisp, orderly aesthetic. It is bold enough to catch the eye from across a craft fair aisle, yet minimal enough to work on a dozen different handmade product types.
My first impression? The Orange Triangle Ruler leans into a modern, almost playful academic mood. The orange keeps it from feeling too serious or corporate. It is not rustic or farmhouse, and it is not cutesy in a cartoon way. Instead, it whispers STEM, geometry, and technical drawing with a pop of color. That is a sweet spot for craft fair product sellers who want to attract a slightly older, more design-conscious buyer while still being perfectly appropriate for school-themed displays. I can already picture it on a simple cream tote bag, looking like a vintage school supply catalog come to life.
How the Orange Triangle Ruler Reads at a Booth
At a craft fair, you have seconds to grab attention. The Orange Triangle Ruler has a huge advantage: it is universally recognizable. The triangle shape is simple, and the little hash marks along the edges make it clear what it represents. Even from a distance, a customer will see that orange silhouette and immediately register it as a ruler or a drafting tool. That quick recognition is pure gold when you are competing with lace, florals, and funny sayings. The design is easy to understand at a glance, and that is exactly what you want for a table display where every product fights for a second of eye contact.
Because it is so graphic, it works beautifully as a tote bag design. A large, centered placement on a natural canvas bag turns a simple carryall into a statement piece for teachers, college students, or architects. I would also stitch it on a charcoal or navy apron for a commercial embroidery look that feels smart and professional. The contrast between the orange thread and a dark background makes the measurement markings pop, and the whole design instantly communicates "I love precision."
Product Matchmaking: Where the Orange Triangle Ruler Truly Sells
Not every embroidery file performs equally well on every product. For the Orange Triangle Ruler, I tested a mental mockup on the items I always bring to a weekend market. Here is my honest breakdown.
Tote Bags and Market Bags
This is the star product. The flat, open canvas of a tote bag gives the design room to breathe. The Orange Triangle Ruler looks best when it is at least 4 inches wide, so the measurement markings stay crisp. A natural or off-white fabric lets the orange thread glow, and the design feels like a limited-edition artist collaboration. For Etsy seller listings, I would photograph the tote styled with a few real drafting tools and a notebook—the storytelling sells itself.
Aprons and Kitchen Towels
An apron embroidery featuring this design on the chest or hip pocket adds a quirky, nerdy-chic touch. Imagine a math teacher rocking this at a barbecue. For tea towel embroidery, I would use a smooth, flat-weave linen. The design’s straight lines and sharp angles need a stable fabric, so avoid fluffy or heavily textured towels. A neat placement on the lower half of a tea towel, paired with a simple border, creates a giftable handmade product that feels both practical and clever.
Patches and Small Pouches
If you downsize the Orange Triangle Ruler to about 2.5 inches, it becomes a fantastic embroidered patch. The key here is to check stitch density—the measurement lines are tiny, and if the file packs too many stitches into a small space, you risk thread breaks or a stiff, puckered patch. Test on scrap fabric first. A patch sewn onto a plain canvas pencil case or a zipper pouch is a small, low-cost item that sells fast, especially to students. I would offer these in a set of three school-themed patches for a higher perceived value.
Caps and Curved Surfaces
I am cautious about caps. The Orange Triangle Ruler has straight edges and a rigid geometric shape, which can look distorted on a curved cap front. If you do try it, use a low-profile cap and keep the design size modest. Watch out for the measurement markings near the edges—they can blur or become illegible on the textured curve. I would personally skip caps for this design and focus on flat goods.
Pillow Covers and Home Decor
A larger, central placement on a throw pillow cover turns the Orange Triangle Ruler into a decor piece for a modern study or a teen’s room. It leans into that mathematics and drafting theme without being childish. This is a small shop product that can command a higher price point because it looks intentional and design-forward.
Practical Production Notes Every Maker Needs
Before you add this design to your production lineup, run through the same checks I do before a craft fair weekend. The Orange Triangle Ruler is not a complicated file, but it has details that trip up machines if you are not careful.
Stitch density and tiny details: The measurement markings are the soul of this design. If they are too dense, the fabric puckers and the lines blur. If they are too light, they disappear. I always stitch out a test on the exact fabric I plan to use. Look at the markings under natural light. If any line looks faint, you might need to adjust thread tension or switch to a slightly thicker thread.
Thread color contrast: The orange needs to be vibrant but not neon. A burnt orange or a true school-bus orange works best. On dark fabric, the orange shines, but on light fabric, you need to ensure the markings are visible. Test on a cream, a gray, and a black swatch. The design should remain legible across all three. If it fades into a white background, that limits your product options.
Fabric texture and stabilizer: This is a geometric design. Any wobble in the fabric shows immediately. I use a firm cut-away stabilizer for tote bags and aprons, and a tear-away for lighter cottons. For tea towels, a water-soluble topper is a lifesaver to keep the stitches from sinking into the pile. Always, always hoop tightly. The straight edges of the triangle will expose any shifting.
Hoop size and placement: The file should fit comfortably in a 4x4 or 5x7 hoop for most products. If you need to enlarge it, confirm the stitch count and density scale well. I never assume a design scales cleanly—a quick test stitch saves a lot of wasted blanks.
Small lettering and fine lines: While the description mentions measurement markings, these are not full words, just tiny lines and numbers. If the file includes any numerals, inspect them at actual size. If they are under 5mm tall, they might become illegible. I prefer to keep the Orange Triangle Ruler at a size where the markings are clearly visible, which means it works best as a medium to large focal design rather than a tiny accent.
How the Orange Triangle Ruler Boosts Booth Appeal and Sales
When I set up my booth, I always think in terms of color blocks and themes. The Orange Triangle Ruler is a natural anchor for a Back To School collection. It pairs beautifully with other academic-themed designs—a protractor, a compass, a pencil—but it also holds its own as a standalone piece. The orange pops against a neutral booth background, and grouped products create a cohesive, professional look that signals brand consistency to buyers.
This design increases customer attention because it is slightly unexpected. Everyone has seen an apple embroidery, but a set square with measurement markings? That is a conversation starter. I have learned that designs that make people smile and say, "Oh, my geometry teacher would love this," sell faster. The Orange Triangle Ruler triggers that nostalgic, intellectual connection, and that emotional hook often translates to impulse purchases.
From a product value standpoint, the design elevates a simple blank into something that feels curated. A tote with this embroidery looks like a boutique find, not a DIY project. That perception lets you price a little higher. For Etsy sellers, the photography is effortless. The bold orange and clean lines photograph beautifully on a flat lay with a white background. You can also create a printable mockup using the digital embroidery file’s visual preview to test product listings before you stitch a single item.
Batch Production and Repeatability
For a craft fair, you need designs that you can stitch efficiently. The Orange Triangle Ruler is a good candidate for batch production if the stitch count is sensible. A single-color design (or mostly orange with maybe a dark outline) stitches fast. You can run multiple items on a multi-needle machine without frequent thread changes. I appreciate designs that do not require a dozen color stops when I am trying to build inventory for a weekend show. The simplicity here is a production advantage.
However, I always check the digital embroidery file for any unnecessary trims or jumps. A clean file paths the needle efficiently, saving time. If the design has a lot of tiny stops for the markings, that could slow things down. Test one run and time it before you commit to making twenty.
Important Pre-Production Designer Notes
I keep a checklist for every new design I bring into my commercial embroidery work. For the Orange Triangle Ruler, here is what I would do before selling a single finished product:
- Stitch the design on scrap fabric first, using the exact thread and stabilizer I plan to use for production.
- Check thread contrast on at least three fabric colors: light, medium, and dark.
- Review the spacing of the measurement markings. Are they even? Do they distort at the edges?
- Confirm the hoop size required. The file should fit comfortably with at least a half-inch margin for hooping.
- Inspect stitch density—too dense and the fabric puckers; too sparse and the orange color looks weak.
- Use the correct stabilizer for each fabric type. No one wants a wrinkled triangle.
- Create at least one real mockup product, not just a digital preview. A finished tote or towel gives you the true feel of the design.
- Compare how the Orange Triangle Ruler looks on different fabric textures. A smooth canvas versus a slubby linen will change the sharpness of the lines.
- Confirm commercial embroidery licensing. The product description does not detail the license terms, so I always check the original source’s policy before selling finished items. Never assume.
I also look at the overall artwork quality. The Orange Triangle Ruler is described as having measurement markings along two edges. That is exactly what you want for a realistic set square look. If the file is well-digitized, those markings will be crisp and perfectly spaced. If they are sloppy or too thick, the whole design loses its technical drawing charm. This is a case where the detailing truly makes or breaks the finished product.
Final Thoughts from a Booth Perspective
As I mentally lay out my craft fair table, I am placing the Orange Triangle Ruler right in the middle of my Back To School section. It will be the anchor piece that ties together the teacher gifts, the student accessories, and the quirky office supplies. I will have a few tote bags, a stack of tea towels, and a small basket of zipper pouches all featuring this design. The orange color will draw shoppers in, and the clever geometry will close the sale. This is a design that looks like you put thought into it, and that is the secret to standing out in a sea of handmade goods.
For any embroidery business owner or creative entrepreneur building inventory for a market, the Orange Triangle Ruler is a smart addition. It is not a trend that will feel dated in a year. It is classic, a little nerdy in the best way, and versatile enough to cross over from school supplies to home decor. Just remember to test, stabilize, and respect the details. When those measurement lines stitch out perfectly, the finished product looks like a premium craft fair product that customers will grab and not put back down.