Stop Sign Embroidery Design
First Impressions: A Bold, Recognizable Symbol
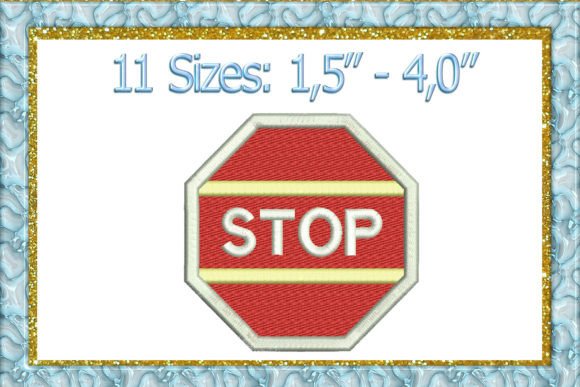
When I first opened the Stop Sign Embroidery Design file, the immediate reaction was one of playful authority. The design delivers a classic octagonal stop sign silhouette, complete with crisp, full‑stitch fills that promise a dense, durable finish. It’s not a delicate, decorative piece — it’s a statement graphic. The bold lines and familiar shape read as professional, friendly, and instantly recognizable, which is exactly what you want when you’re creating branded merchandise for a small business, café, or handmade shop.
Because the design is categorized under School, it naturally suits safety campaigns, crossing guard uniforms, and back‑to‑school promos. But as an embroidery designer, I see a much wider canvas. The stop sign motif carries a sense of attention, urgency, and charm that can be repurposed for bakeries (“Stop for a cupcake”), pet brands (“Stop and sniff”), florists, or even a boutique clothing line that wants to add a quirky, nostalgic patch to a denim jacket. The fact that it’s a full‑stitch embroidery design, not just an outline, gives it a premium, tactile feel that elevates any product it touches.
Sizing and Versatility: 11 Sizes for Every Product
One of the strongest selling points of this machine embroidery design is the included 11‑size range. The largest size clocks in at 3.99” x 3.99” (101.4mm), which is essentially a 4‑inch square. That’s a sweet spot for a chest logo, a back patch on a cap, or a statement piece on a tote bag. The variety of smaller sizes means you can scale down for a sleeve accent, a subtle apron mark, or a set of coordinated product labels without losing detail — assuming the stitch density holds up. I always recommend testing the smallest size on a scrap of your target fabric first, because what looks crisp on a screen can become a muddy mess if the stitch count isn’t optimized for that scale.
For business owners, this multi‑size offering is a cost‑effective asset. You can use the same design file for a cap embroidery on dad hats, a tote bag design for customer giveaways, and a tiny version on a plush tag for handmade goods. The cohesion across products strengthens your brand identity without requiring you to purchase multiple separate designs. Just remember to check the hoop size requirements for each version — the largest size will need at least a 4x4 hoop, but many multi‑needle machines or commercial embroidery setups can handle that easily.
Stitch Quality and Density Considerations
Stop Sign Embroidery Design is described as a full stitch embroidery design, meaning the entire area is filled with thread rather than relying on outline satin stitches. This creates a heavy, patch‑like presence that feels substantial. For an embroidered patch destined for a work shirt or a canvas bag, that density is a plus — it withstands washing and wear beautifully. However, on lightweight fabrics like a soft cotton tee or a silk scarf, the same density can cause puckering if you don’t use the right stabilizer. I always cut a test on a similar weight fabric and adjust the underlay and tension if needed.
The red‑and‑white contrast of a stop sign is iconic, but thread color choice is critical. A pure white fill on a dark uniform can look stark; sometimes an off‑white or cream adds a vintage, worked‑in feel that suits boutique brands. The lettering — if the design includes the word “STOP” — must be perfectly legible at small sizes. I’d advise running a black‑and‑white sew‑out first to check that the spacing and registration are solid before committing to production colors. Digitizing quirks like overlapping stitches or uneven density become glaringly obvious in a single‑color test.
Real‑World Business Applications: From Café Aprons to Branded Patches
I’ve advised dozens of small businesses, and the Stop Sign Embroidery Design could easily slide into their merch lineup. Here’s a quick rundown of how I see it performing:
- Staff Uniforms & Aprons: A 3‑inch version on a black barista apron immediately draws the eye. It adds a touch of whimsy without looking unprofessional, especially if you pair it with your café name underneath.
- Cap Embroidery: Placed on the front panel of a structured cap, the design works as a bold focal point. Because the largest size is almost 4 inches, test it on a curved cap frame to ensure the octagon doesn’t distort. A slightly smaller size (around 3.5”) often reads better on a hat.
- Tote Bag Branding: A full‑size 4‑inch embroidery on a canvas tote bag transforms a plain bag into a minimalist, message‑driven accessory. Imagine a bakery’s logo underneath the stop sign — it becomes a walking billboard.
- Embroidered Patches: This is where the design truly shines. Finish the edges with a merrow border or a satin stitch edge, and you’ve got a ready‑to‑sell patch that customers can iron or sew onto jackets, backpacks, or even pet harnesses. The dense fill gives it a satisfying, tactile quality.
- Handmade Product Labels: For a craft business, a tiny stop sign embroidered onto a fabric tag sewn into a quilt or a plush toy adds a charming, professional signature. Just make sure the smallest size doesn’t lose the lettering detail.
- Event Merch & Giveaways: A stop sign with a clever twist (“Stop for a sweet treat”) can anchor a limited‑edition run of tees or hoodies for a pop‑up market or festival.
Designing for Brand Identity: How a Stop Sign Can Elevate Your Merch
Using a Stop Sign Embroidery Design isn’t just about slapping a graphic on a product — it’s about what that symbol communicates. A stop sign commands attention, implies a pause, a moment of consideration. For a coffee shop, it says “slow down and enjoy your espresso.” For a yoga studio, it might mean “stop, breathe, and be present.” That layer of meaning can deepen customer trust and brand recognition when used consistently.
Visual consistency is key. If you’re using this design on a tote bag, a cap, and an apron, make sure the placement and thread colors match your brand’s palette. The design itself acts as a design asset that ties your merchandise together. When customers see that stop sign, they should immediately associate it with your business. I’ve seen small brands build entire collections around a single emblem, and this bold, simple shape is perfect for that. It’s friendly without being childish, rustic when paired with textured fabrics, and modern when stitched in a single, vibrant color.
Material and Fabric Performance: Testing on Real Textiles
Before you commit to a production run, test the Stop Sign Embroidery Design on the actual materials you’ll be using. Here’s what I’ve learned from years of trial and error:
- Canvas & Denim: These heavy, stable fabrics are ideal. The dense stitch sits beautifully, and with a cut‑away stabilizer, you’ll get a clean, professional finish that lasts for years.
- Performance Wear & Technical Fabrics: Stretchy, moisture‑wicking materials can be tricky. The design’s heavy fill may cause tunneling or distortion. Use a fusible no‑show mesh stabilizer and consider reducing the density slightly if your software allows.
- Dark Uniforms: The contrast is striking, but watch for white thread showing through from the back. A black bobbin thread and a careful underlay can minimize this. I always do a wash test on a dark garment to check for any show‑through after a few cycles.
- Curved Surfaces: Caps, in particular, can warp the octagonal shape. Use a cap‑specific hoop and digitize a slight downward curve if you’re adapting the file. The provided sizes might be flat; you may need to edit the placement angle for a cap front.
Production Notes: Stabilizer, Hoop Size, and Color Choices
As a designer, my standard workflow for a design like this includes a few non‑negotiable steps. First, confirm the hoop size compatibility. The largest size is 101.4mm square, so you’ll need a hoop that accommodates that, plus a little extra for the hoop’s frame. A 4x4 hoop is the minimum; a 5x7 offers more breathing room.
Second, stabilizer selection depends on the fabric. For sturdy woven fabrics, a medium‑weight cut‑away stabilizer works perfectly. For knits, add a topper to prevent the stitches from sinking into the pile. I also recommend doing a quick sew‑through on a piece of the same fabric layered with the stabilizer you plan to use — it’s the only way to catch tension issues before you ruin a finished garment.
Third, thread colors are more than just red and white. The “red” of a stop sign can vary from a bright cherry to a deep maroon. I’d suggest ordering a few sample spools and stitching swatches to see how they look under different lighting before ordering 50 uniforms. Don’t forget to consider the bobbin thread color; a bright white bobbin on a dark shirt can create a halo effect if the tension isn’t perfect.
The Designer’s Workflow: From File to Finished Product
When I’m preparing a client’s merchandise, I follow a checklist that you can adapt for the Stop Sign Embroidery Design:
- Download and inspect the file. Since it’s an instant download, check the included formats and ensure they match your machine’s requirements. The description mentions “stop machine Embroidery Design” — likely a typo, but verify the file extensions.
- Create a printable mockup. Use a photo of a blank tote or cap and overlay a digital preview of the embroidery. This helps clients visualize the placement and size before you sew a single stitch. I always include at least two size options in the mockup so they can choose.
- Sew a black‑and‑white test. This reveals any registration or density issues without the distraction of color. If the lettering looks messy or the octagon edges are wobbly, you’ll spot it immediately.
- Test on the actual garment. Sew the design on a scrap of the same fabric, with the same stabilizer, and wash it at least once. Check for shrinkage, thread breakage, and colorfastness.
- Compare with other design assets. If you’re building a brand, the stop sign should sit comfortably alongside your logo, tagline, and any other embroidered elements. Make sure the visual weight and style are consistent.
- Confirm commercial licensing. While this is an instant download embroidery file, always verify the seller’s license terms. Most designers allow commercial use on physical products, but some restrict mass production or reselling of the digital file itself. Clarify before you invest in a large run.
Special Considerations for Small Patch Sizes
If you’re planning to use the Stop Sign Embroidery Design as a tiny patch — say, 1.5 inches or smaller — exercise caution. The full‑stitch fill that looks fantastic at 4 inches can become a dense, bulletproof lump when scaled down. Fine details like the word “STOP” may disappear entirely. Before committing to a small patch, run a sew‑out of the smallest size included in the pack. If the lettering is illegible, consider using the design as a blank octagon and adding your own text later, or simply use it as a graphic element without text. For a branded patch meant to be sold as a standalone item, a 3‑inch version is often the sweet spot — large enough to read, small enough to be versatile.
Final Verdict: A Versatile Design for Bold Branding
The Stop Sign Embroidery Design brings a lot of personality to the table. It’s not a subtle, background filler — it’s a front‑and‑center emblem that demands attention. For a small business looking to create custom apparel, embroidered patches, or cohesive handmade product packaging, this design offers a ready‑to‑use, graphic punch. The 11 sizes give you flexibility, and the full‑stitch build ensures a durable, premium finished product. Just remember to test thoroughly, tweak your stabilizer, and think creatively about how a simple stop sign can tell your brand’s story. Whether you’re stitching onto a café apron, a cap, or a tote bag, this design can become a memorable part of your visual identity — as long as you treat it with the same care you’d give any other critical design asset.